Key Takeaways
- The core tools for camping are a knife, multi-tool, and lighting source (flashlight or headlamp)—these three items solve 80-90% of common campsite problems.
- Larger tools like a hatchet, folding saw, and shovel are optional but highly valuable for processing firewood, digging fire pits, and setting up your campsite efficiently.
- Car and RV campers can carry a more complete toolkit with full-size tools, while backpackers must prioritize weight and focus on multi-use gear.
- A small repair kit containing tape, cord, a sewing kit, and spare parts often saves camping trips when gear breaks far from help.
- Safety should always be top of mind—pack first-aid supplies, signaling devices, and backup lights, and practice using your tools before heading into the wilderness.
Whether you’re planning a weekend at a developed campground or a week-long backcountry expedition, having the right tools can make the difference between a frustrating trip and a memorable outdoor adventure. The challenge isn’t finding camping gear—it’s knowing which tools actually matter and which ones will just add bulk to your pack.
In this guide, we’ll walk you through everything from the essential knife-multi-tool-flashlight trifecta to optional big tools for serious campsite work. You’ll learn how to balance portability and functionality, what quality levels make sense for different budgets, and how to keep your camping tools performing reliably for years.
Tools for Camping: A Complete List
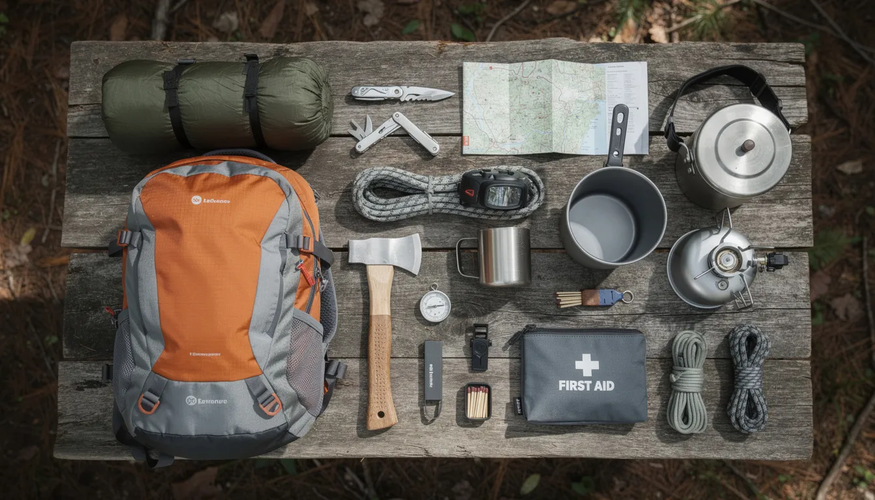
Before diving into specifics, let’s establish a structured, practical list of camping tools that covers everything from weekend car camping to week-long backcountry outings. This isn’t a one-size-fits-all checklist—you’ll need to adapt based on your trip type (car, RV camping, backpacking, canoe, overlanding) and the season you’re heading out.
Here’s how to think about your toolkit by category:
Cutting Tools
- Primary camping knife(fixed or folding blade)
- Multi-tool with pliers and screwdrivers
- Folding saw for firewood processing
- Hatchet or small axe for splitting wood
Lighting Equipment
- Primary headlamp or flashlight (200-500 lumens)
- Backup light source (keychain light or spare headlamp)
- Camp lanternfor area illumination
- Extra batteries or rechargeable power bank
Big Campsite Tools
- Mallet or hammer for tent stakes
- Folding shovel or trowel
- Rope and paracord for various rigging tasks
Repair Supplies
- Duct tape or gear-specific repair tape
- Zip ties and safety pins
- Sewing kit with heavy thread
- Spare tent stakes and pole sleeves
- Cord and paracord (550-lb test)
Safety and Emergency Tools
- First aid kit with 30-50 essential items
- Whistle for signaling(100-120 decibels)
- Fire-starting tools(lighter, ferrocerium rod)
- Navigation tools (map, compass, GPS)
Weight and bulk matter far less for car and RV campers, which means you can bring full-size mallets, dedicated shovels, and even a complete toolbox without worrying about your back. However, minimalist backpackers should focus on multi-use tools—a quality multi-tool with pliers, a lightweight headlamp, and a compact knife can handle most cases while keeping pack weight under control.
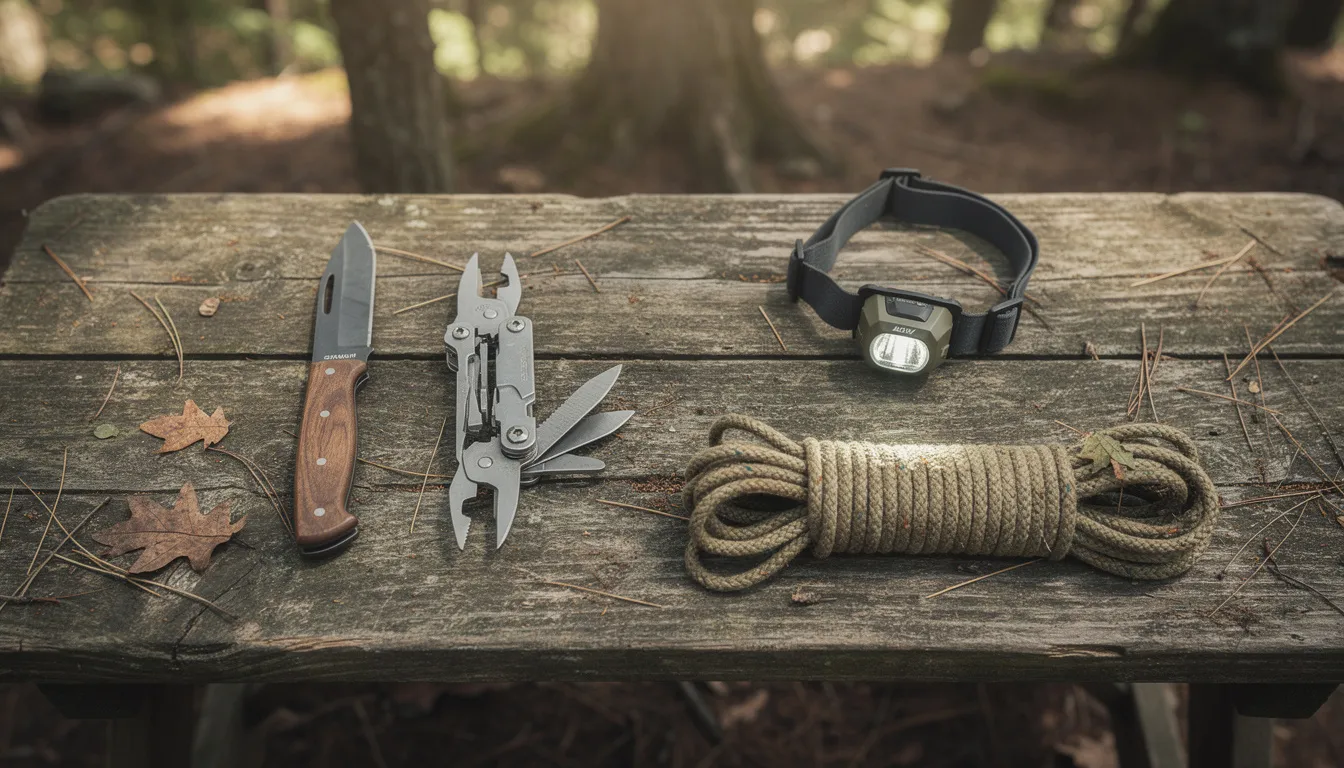
The Core of Your Camping Toolkit: Knife, Multi-Tool & Flashlight
Most campers can solve 80-90% of common problems with three core items: a solid knife, a reliable multi-tool, and dependable lighting. These are the tools worth investing in from reputable outdoor brands like Leatherman, Victorinox, Fenix, Petzl, or Black Diamond—because reliability is critical when you’re miles from the nearest hardware store.
Each tool has distinct primary jobs:
- Knife: Food preparation, cutting cordage, carving, and emergency tasks
- Multi-tool: Repairs, small hardware work, and backup cutting functions
- Flashlight or headlamp: Night navigation, camp chores, and safety
Let’s explore each of these indispensable items in detail.
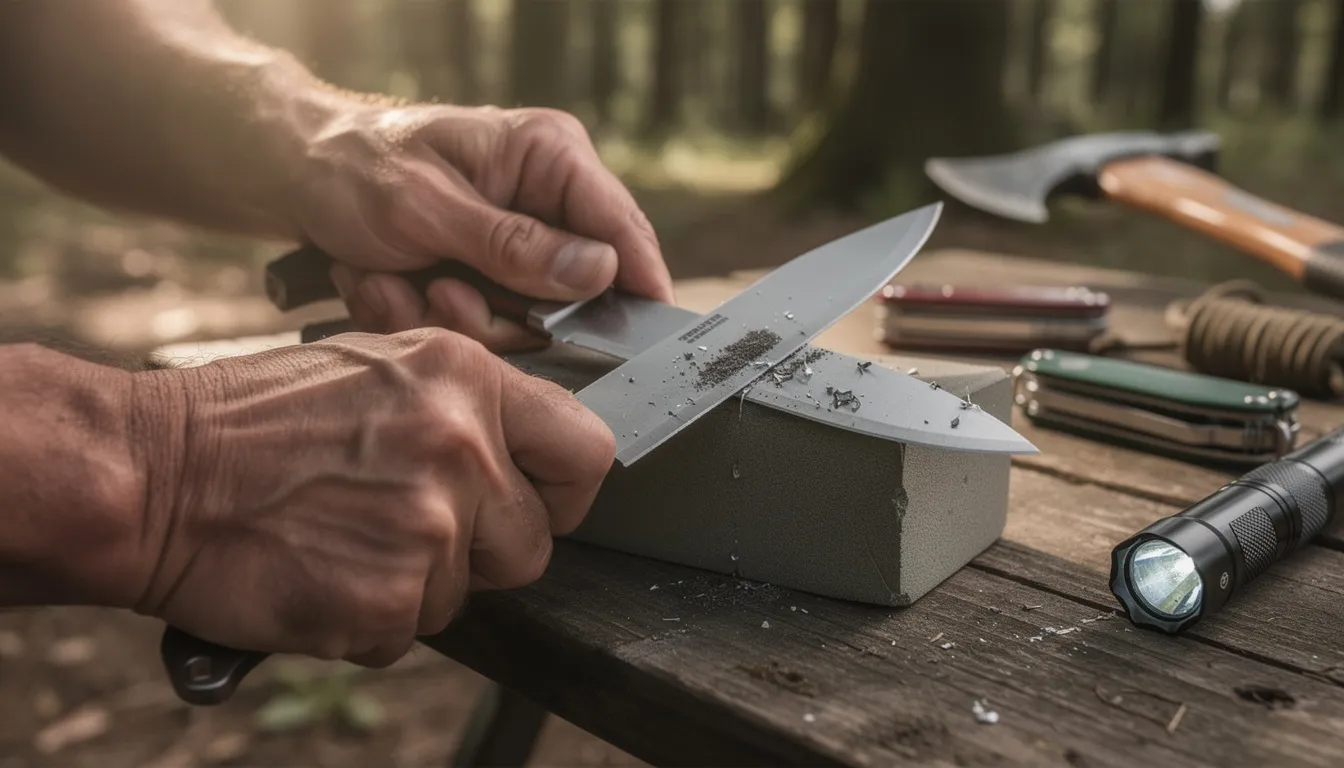
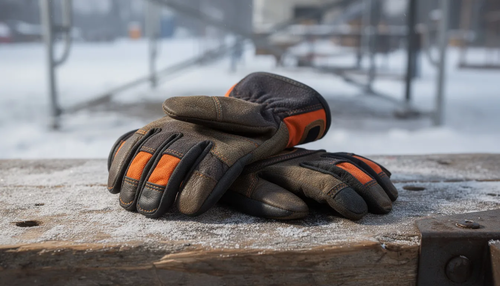
The Most Important Tool for Camping: Your Camping Knife
A dedicated camp knife—whether fixed or folding—is more capable than the small blade found on most multi tools. The larger blade, better ergonomics, and specialized design make it the go-to tool for daily use around the campsite.
Common tasks for your camping knife include:
- Slicing food during meal prep
- Carving improvised tent stakes or cooking sticks
- Cutting paracord and rope to length
- Feather-sticking kindling for fire starting
- Opening stubborn packaging
- Basic first-aid cutting needs
Fixed-Blade vs. Folding Knives
For those interested in other versatile EDC tools beyond knives, consider exploring the best multi tool pens that combine writing instruments with useful gadgets.
Feature | Fixed-Blade (e.g., Morakniv Companion, ESEE-4) | Folding (e.g., Spyderco Tenacious) |
|---|---|---|
Blade Length | 4-5 inches typical | 3-4 inches typical |
Strength | Superior—no pivot point to fail | Good with quality locks |
Safety | Predictable, always ready | Requires lock verification |
Packability | Requires sheath, more bulk | Compact, pocket-friendly |
Price Range | $15-150 | $30-200 |
When shopping for a camping knife, look for these key features:
- Comfortable handle that won’t slip when wet
- Non-slippery grip material (rubber, textured G-10)
- Simple, secure sheath for fixed blades
- Easy-to-sharpen steel (avoid exotic super-steels if you’re new to sharpening)
- Secure locking mechanism on folders
For safety at camp, always store your knife in a dedicated spot in your backpack. Never leave a blade loose in the tent or around children, and establish clear rules about who can access and use knives in your group.
A Camping Multi-Tool: Your Multi-Purpose Problem Solver
Think of the multi-tool as your “field toolbox”—a device that combines pliers, screwdrivers, scissors, and more into one compact package. According to KOA surveys, about 70% of commonly forgotten camping items are things like can openers and bottle openers, which is exactly why a camping multi tool earns its place in every kit.
Most Useful Functions for Camping:
- Needle-nose pliers for bending tent stake hooks and handling hot stuff
- Wire cutters for cord and light wire work
- Phillips and flathead screwdrivers(or a bit driver system)
- Scissors for cutting tape, fabric, and bandages
- Awl for punching holes in leather or fabric
- Can opener and bottle opener
- Secondary small blade or saw
Real-world tasks where multi tools shine:
- Tightening loose stove screws
- Adjusting camp chair hardware
- Repairing lanterns and cooler latches
- Quick fixes on roof boxes and vehicle accessories
- Opening cans when you forget the kitchen opener
Comparing Multi-Tool Styles
Type | Examples | Weight | Best For |
|---|---|---|---|
Full-Size Belt Carry | Leatherman Wave+, Charge+, Gerber Center-Drive | 7-9 oz | Car camping, basecamp, RV camping |
Lightweight EDC | Skeletool CX, Leatherman Free T4 | 4-5 oz | Backpacking, everyday carry |
Keychain/Ultralight | Victorinox Classic SD, Leatherman Squirt | 1-2 oz | Minimalist trips, backup tool |
Outdoor Gear Lab’s 2026 testing ranked the Leatherman Wave+ as a best seller for camping applications, offering 18 functions at just 8.5 ounces. Car campers can justify carrying a heavier, more feature-rich model, while backpackers might prefer a smaller 5-7 oz multitool with only essential functions.
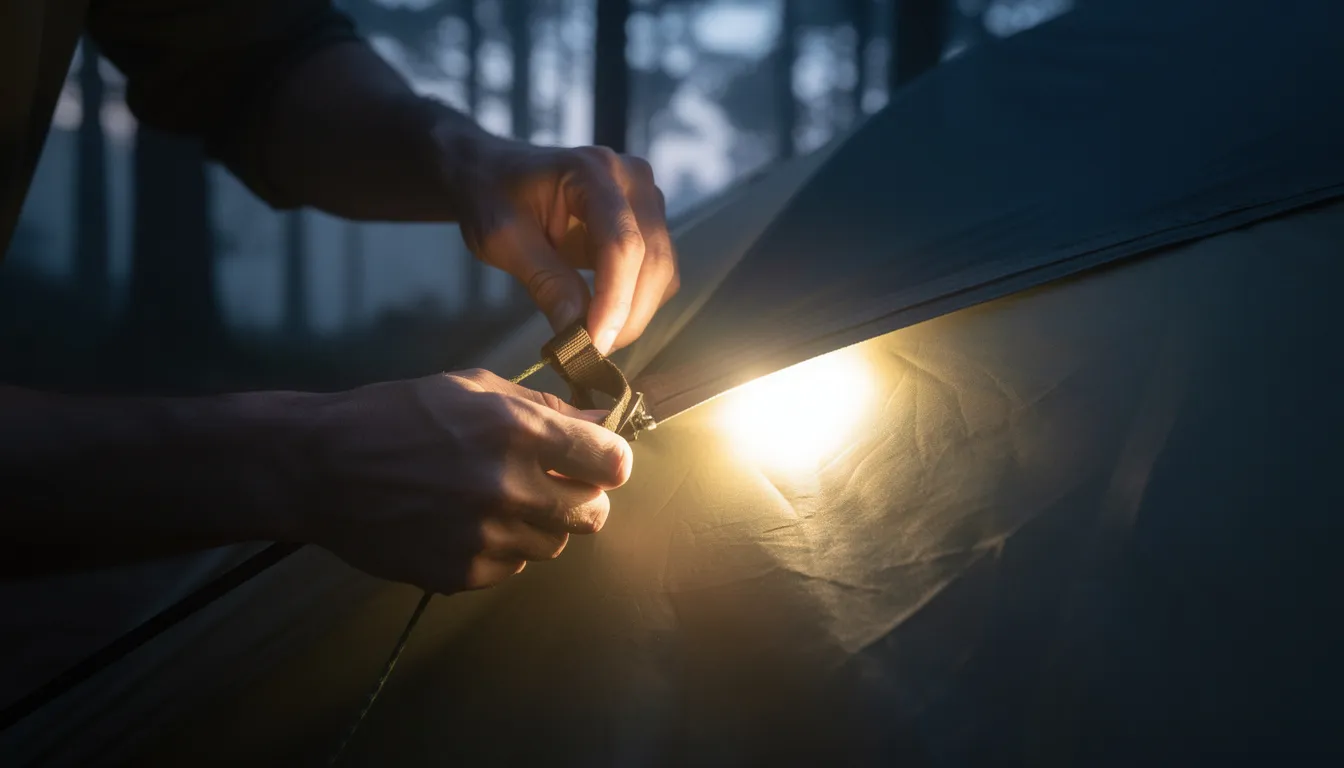
A Camping Flashlight or Headlamp: Indispensable Night Tools
Adequate light is critical for safety at any campsite. Without it, you’re risking trips over guy lines, burns from cooking in the dark, and the frustration of not finding gear when nature calls at 2 AM.
Headlamp vs. Handheld Flashlight
Consideration | Headlamp | Handheld Flashlight |
|---|---|---|
Hands-Free Use | Yes—follows your line of sight | No—occupies one hand |
Best For | Tent setup, cooking, hiking at night | Signaling, long-distance beam, vehicle work |
Beam Pattern | Usually flood or adjustable | Often tighter spot beam |
Typical Lumens | 150-400 for general use | 200-1000+ for powerful models |
Key specs to consider when choosing your primary light or other essential survival gear:
- Brightness: 150-300 lumens handles most camp tasks; go higher for trail navigation
- Adjustable brightness: Saves batteries and preserves night vision
- Water resistance: At least IPX4 for rain protection
- Red-light mode: Preserves night vision by minimizing pupil dilation—a valuable feature for tent use
Reliable examples include the Petzl Tikkina or Black Diamond Spot for headlamps, and compact Fenix or Olight models for handheld options. Modern Cree LEDs offer 50,000-hour lifespans, making quality lights a long-term investment.
Choose lighting that runs on common batteries (AA/AAA) or features USB-rechargeable batteries you can top up from a power bank. Carrying extra batteries is always smart—there’s nothing worse than a dead light when you need to explore the trail back to camp.
Optional Lighting Equipment: Lanterns and Extra Illumination
While you can camp safely with only a headlamp or flashlight, additional lighting dramatically improves comfort and group visibility. Lanterns are especially helpful for family camping, evening card games at the picnic table, and illuminating a larger area than any single beam can cover.
This section focuses on two optional lighting tools: a campsite lantern and backup or ambient light sources. Backpackers often choose very small lanterns or rely on a headlamp plus a diffuser cap, while car and RV campers can bring heavier, brighter models without concern.
A Camping Lantern
Lanterns provide 360-degree area light that transforms cooking, group activities, and gear organization under a canopy or inside a large tent. They’re a convenience item that quickly becomes essential once you’ve experienced the difference.
Lantern Types Compared:
Type | Power Source | Pros | Cons |
|---|---|---|---|
LED Battery-Powered | AA/D batteries | Reliable, affordable, widely available fuel | Heavier, battery waste |
USB Rechargeable | Built-in lithium battery | Lightweight, often includes USB ports for charging devices | Requires access to charging |
Propane/Liquid Fuel | Pressurized canisters | Very bright, hot (can provide warmth) | Fire risk, not for tent interiors |
Popular options include compact USB-rechargeable lanterns from Goal Zero or Black Diamond, typically offering 150-400 lumens with 20-80 hour run times depending on brightness settings.
Safety tips for lantern use:
- Hang lanterns from a tripod, branch, or tent loop—never place directly on flammable surfaces
- Never use fuel-burning lanterns inside enclosed tents due to fire and carbon monoxide risks
- Position lanterns away from high-traffic areas to prevent knock-overs
Lanterns are a smart “luxury item” for basecamps, extended campground holidays, and camping trips with children who prefer softer, ambient lighting over harsh headlamp beams.
Backup and Ambient Lights
Always carry at least one backup light source. A mini keychain flashlight, tiny button-cell lamp, or spare headlamp ensures you’re never left in complete darkness if your primary light fails. This redundancy is especially valuable in wilderness settings where help isn’t nearby.
Small clip-on lights or string lights can also improve tent organization, reduce tripping at guy lines, and make it easier to find camp from a short distance away at night.
Practical Ambient Lighting Tips:
- Use a headlamp inside a translucent water bottle as a makeshift lantern—it diffuses light beautifully
- Attach glow sticks or reflective tape to tent stakes and guy lines to prevent trips
- Clip a small LED to your tent zipper for easy nighttime access
Choose backup lights that are lightweight, affordable, and ideally use the same batteries as your primary light to simplify your spare battery situation.
Big Tools for Camping: Hatchet, Shovel & Folding Saw
Larger tools aren’t mandatory for every trip, but they can dramatically increase self-sufficiency and comfort—especially for car-based or long-stay camps where you’re processing firewood, building fire pits, or leveling tent pads.
Before using any of these tools, always check local regulations and follow Leave No Trace guidelines. Many areas restrict wood cutting or ground disturbance, and respecting these rules protects both the environment and your access to public lands.
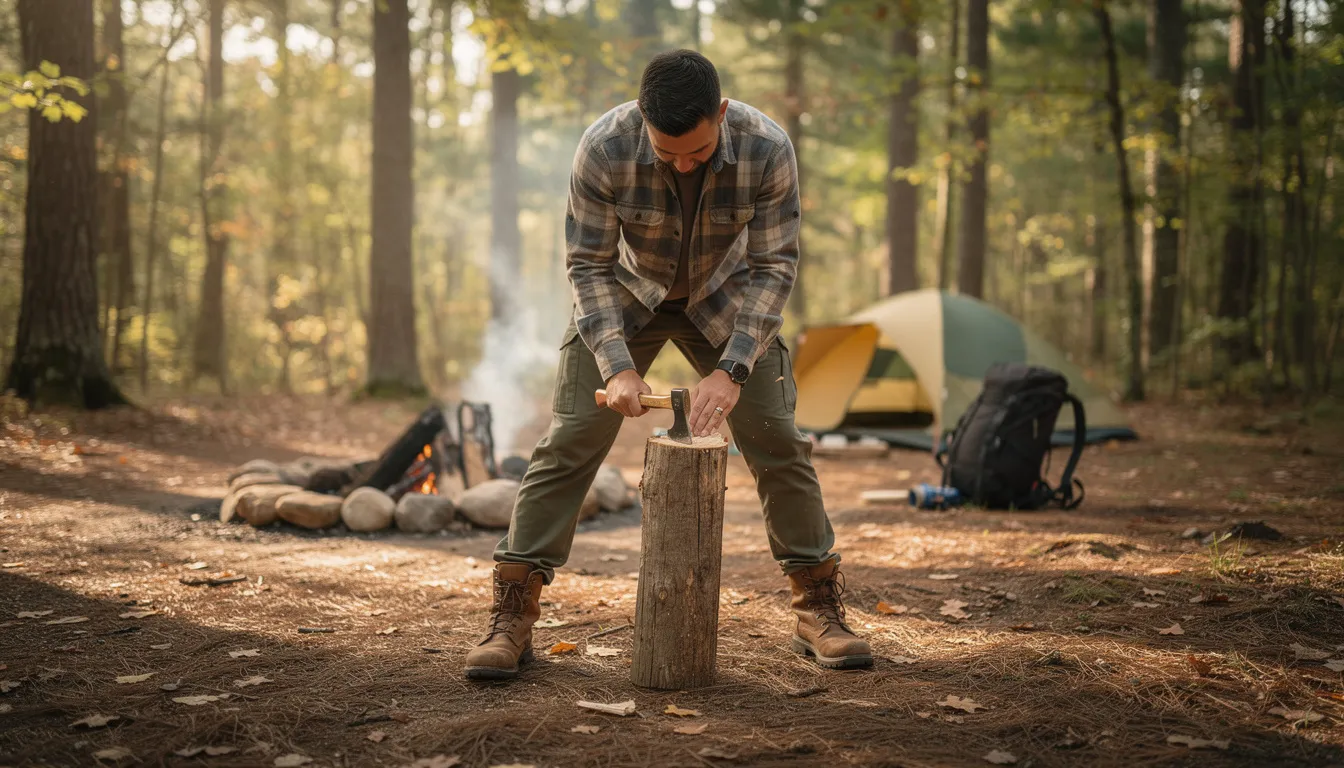
A Camping Hatchet: Small Axe, Big Utility
A camping hatchet handles tasks that would be slow or impossible with a knife:
- Splitting small firewood into kindling
- Shaping stakes or poles from found wood
- Driving tent stakes when a mallet isn’t available
- Basic brush clearing around the fire ring
A hatchet differs from a full-size axe primarily in handle length (12-16 inches vs. 24-36 inches), allowing one-handed use and easier packability. Most campers find a hatchet sufficient; a full axe only makes sense for extended trips with serious wood processing needs.
Recommended Specifications:
- Head weight: 1-1.5 lbs
- Handle length: 12-16 inches
- Head hardness: 55-60 HRC Rockwell for edge retention
- Popular brands: Fiskars, Estwing, Gransfors Bruk
Safety is Critical with Hatchets
CDC data shows approximately 12,000 axe-related injuries annually in the U.S., so proper technique matters:
- Establish a clear chopping zone away from other campers
- Use a stable chopping block—never chop toward your body or on the ground where the blade could deflect
- Keep blades sharp (dull blades require more force and are more likely to glance off)
- Always use the sheath when carrying or storing
- Practice basic chopping and splitting techniques at home before relying on the tool in the wilderness
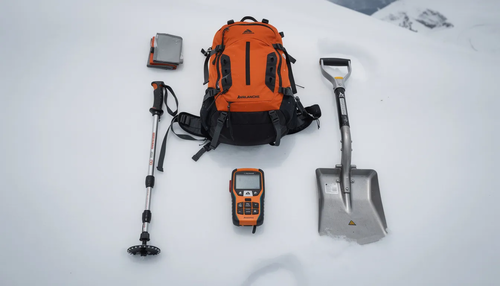
A Shovel: Versatile Ground Tool for Campers
A camping shovel serves multiple roles that make it surprisingly valuable:
- Digging latrine holes (cat holes) where permitted
- Building or cleaning fire pits
- Leveling tent pads on uneven ground
- Digging out stuck vehicle tires on overlanding trips
- Moving hot coals and extinguishing fires
Shovel Types for Camping:
Type | Weight | Best For | Limitations |
|---|---|---|---|
Compact Folding (Entrenching Tool) | 1-2 lbs | Backpacking, car camping | Less leverage, smaller blade |
Full-Length Garden Style | 3-5 lbs | Car/RV camping, overlanding | Too heavy for backpacking |
Ultralight Plastic Trowel | 2-4 oz | Backpacking cat holes only | Won’t handle heavy digging |
Some shovels feature serrated edges for chopping roots or ice, and multi-piece handles that adjust for different tasks.
Leave No Trace Guidelines for Digging:
- Only dig where permitted by land managers
- Cat holes should be 6-8 inches deep and at least 200 feet from water sources
- Fill in all holes completely before leaving
- Avoid damaging sensitive plant roots and stream banks
For backpacking, ultralight plastic trowels (4-6 oz, displacing 200-300 cubic inches of soil) handle cat hole duties perfectly. Car and overland campers benefit from steel or aluminum shovels for heavier ground work.
Another Helpful Tool for Camping: A Folding Saw
A folding saw excels at cutting branches and logs up to a few inches thick—often more safely than swinging an axe. The controlled push-pull motion reduces fatigue by approximately 40% compared to chopping, according to Outdoor Gear Lab evaluations, and produces cleaner cuts. For those looking for other essential tools for camping or outdoor adventures, don't miss the best backpack trowel for your outdoors adventures.
Features to Look For:
- Secure locking blade that won’t fold during use
- Aggressive tooth pattern suited to green or dry wood
- Comfortable grip that won’t slip when wet
- Folded length that fits easily into a daypack (typically 7-10 inches)
Japanese pull-cut saws and compact pruning saws are popular with both hikers and car campers. Bow saws with 24-inch blades cut faster for processing larger quantities of firewood but take up more space.
Responsible Saw Use:
- Respect local rules about collecting dead and downed wood
- Never cut live trees unless facing a genuine emergency and explicitly allowed
- Keep blades clean and lightly oiled to prevent rust
- Always fold the saw when walking around camp to avoid accidental injury
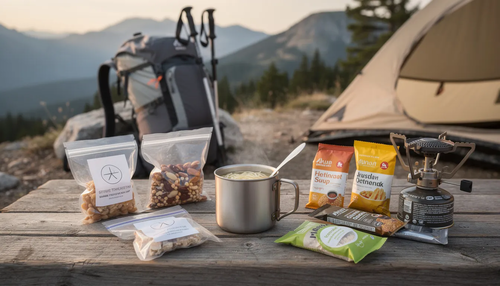
Camping Toolkit Supplies: Repair and Maintenance Essentials
Small repair supplies weigh almost nothing but can absolutely save camping trips when tents, packs, or stoves break far from the trailhead. A well-stocked repair kit addresses the “other things” that inevitably go wrong in the field.
Core Repair Items to Pack:
- Duct tape or Tenacious Tape(gear-specific repair tape)
- Zip ties in various sizes
- Paracord or guyline cord (550-lb test strength)
- Spare tent stakes (at least 2-3)
- Sewing needle and heavy thread
- Small gear patches for tent and pad repairs
- Safety pins (multiple uses as emergency fasteners)
Equipment-Specific Additions:
- Spare O-rings for stoves and water filters
- Pole sleeves for tent pole repairs(aluminum, friction-fit)
- Extra buckles matching your pack or sleeping bag
- Lens cloths for cameras, binoculars, or glasses
- Small bolts or screws that fit camp chairs and tables
Duct tape deserves special mention—quality tape adheres in temperatures from -40°F to 250°F and provides tensile strength exceeding 20 pounds per inch, capable of sealing 1-inch tears under pressure. Wrap some around a water bottle or trekking pole or saw for your outdoor adventures to save bulk.
Pack these supplies in a small waterproof pouch or hard case, and label it clearly as the “camp repair kit” so everyone in your group knows where to find it when something breaks.
How to Select the Right Camping Tools for Your Trip
No single list fits every camper. The best toolkit depends on your transportation method, group size, climate conditions, and personal experience level. What works for a solo backpacker covering 15 miles daily looks very different from a family basecamp with two vehicles.
Think about your most likely tasks:
- Will you build daily campfires requiring wood processing?
- Are you establishing a gear-heavy basecamp for a week?
- Is this a minimalist thru-hike where every ounce matters?
A Simple Framework for Tool Selection:
Category | Examples | When to Include |
|---|---|---|
Must-Have Core | Knife, multi-tool, headlamp, basic repair kit | Every trip, regardless of style |
Nice-to-Have Comfort | Lantern, hammer, full repair kit | Car camping, basecamps, group trips |
Specialized | Hatchet, saw, shovel, survival tools | Extended trips, cold weather, overlanding |
Balancing Portability and Functionality
The fundamental trade-off in camping tools is carrying more for convenience versus keeping pack weight manageable. This tension is sharpest on multi-day hikes or fly-in trips where every ounce affects your comfort and performance.
By Camping Style:
Style | Tool Approach | Weight Budget |
|---|---|---|
Car/RV Camping | Full-size dedicated tools, toolbox acceptable | Essentially unlimited |
Canoe/Kayak | Medium-weight tools, distributed across gear | 5-10 lbs total toolkit |
Backpacking | Multi-purpose gear, compact designs only | 1-3 lbs total toolkit |
Ultralight | Minimal tools, maximum overlap in functions | Under 1 lb total |
Start with a lightweight kit and add tools after a few trips once you understand which tasks cause frequent annoyances or genuine problems. You’ll quickly learn whether a saw would make fire prep easier or if your current setup handles everything fine.
Consider storing a pre-packed “grab-and-go” tool bag at home or in your vehicle. This reduces forgotten items and speeds up departure for spontaneous camping weekends—no more scrambling to find your headlamp buried in the garage.
Tool-Quality vs. Budget: What to Spend More On
Invest in higher-quality items for the tools you use most: your knife, multi-tool, and primary light. Failures in these core tools can be dangerous or trip-ending, and the performance difference between budget and quality options is substantial.
Where to Prioritize Spending:
Tool Category | Spend More | Acceptable to Economize |
|---|---|---|
Primary Knife | Yes—durability, edge retention, safety | — |
Multi-Tool | Yes—reliability, function quality | — |
Primary Light | Yes—water resistance, battery efficiency | — |
Hatchet/Saw | Mid-range works well | Yes, if used occasionally |
Repair Supplies | — | Yes—tape is tape |
Backup Lights | — | Yes—just needs to work |
If you’re on a tight budget, buy fewer tools but better ones. Upgrade gradually, starting with the multi-tool or knife that sees year-round use at home and on trails. Older, surplus, or hand-me-down tools can still be excellent if inspected, cleaned, and sharpened before relying on them in the field.
Considering Specialized or Niche Camping Tools
Some tools target particular camping styles:
- Survival-focused gear: Multi tools with integrated ferro rods and emergency whistles
- Ultralight backpacking: Titanium trowels weighing under 1 oz
- Bikepacking and canoe camping: Compact repair kits with bike or boat-specific components
- Overlanding: Recovery gear like traction boards, hi-lift jacks, and vehicle tool kits
Current 2026 trends highlight lightweight titanium tools (30% weight reduction vs. steel), solar-integrated multi tools charging at 5V/1A, and bio-based paracord from hemp that resists UV degradation twice as long as traditional nylon.
Beginners should master the basics before investing in specialized equipment. However, long-term campers often benefit from niche tools tailored to their favorite activities—a thru-hiker might carry an ultralight trowel, while an overlander invests in serious recovery gear.
Always check local regulations for items like large knives, machetes, or saws, especially when crossing borders or flying to remote destinations. What’s legal in your home state might be restricted elsewhere.
Safety, Storage, and Maintenance of Camping Tools
Tools are only helpful when they’re safe, accessible, and maintained. Neglecting care shortens tool life significantly and can create dangerous situations when you need reliable gear most.
Three pillars of tool management: If your adventure toolkit includes reliable lighting, check out The Best Headlamps for Hiking: Illuminate Your Adventure Outdoors.
- Safe use and handling: Especially for sharp or striking tools
- Smart storage and transport: Preventing damage and injury
- Basic cleaning and maintenance: Preserving performance and durability
Establish clear rules for families and groups about who can handle which tools. Blades and sharp edges should be covered or locked when not in active use—this isn’t just about children; adults trip and fall too.
Safe Handling and Transport
Practical Safety Habits:
- Carry knives and hatchets with blades sheathed—always
- Never pass an open knife to another person
- Check surroundings before swinging or sawing (clear zone of two hands’ reach minimum)
- Work away from your body with all cutting tools
- Use two hands when chopping with a hatchet for maximum control
Packing Tools for Travel:
- Keep sharp tools in a dedicated tool roll or hard case
- Position heavy items (hatchet, shovel) low in vehicle storage where they can’t shift and cause injury
- For backpacks, wrap blades and store in the middle of your pack, away from your back
- Follow airline and public transport rules: all blades and larger tools go in checked luggage only
Training matters more than most campers realize. Watch instructional videos or take short courses on knife safety, axe handling, and wilderness first-aid. The investment in learning proper technique pays dividends in both efficiency and injury prevention. Don't forget, choosing the right gear like rain ponchos can make a significant difference in comfort and safety.
Cleaning, Sharpening, and Rust Prevention
Post-Trip Maintenance Routine:
- Wipe down all metal tools with a dry cloth
- Remove dirt, tree sap, and food residue
- Dry thoroughly before storage—moisture is the enemy
- Apply light oil to hinges, blades, and saw teeth
- Inspect for damage, loose components, or excessive wear
Sharpening doesn’t require expensive equipment or expert skills. A simple whetstone or guided sharpening system works well for most camping knives and hatchets. Focus on maintaining a consistent angle (typically 20 degrees per side for general-purpose edges) rather than achieving a mirror polish.
Storage Between Trips:
- Keep tools in a cool, dry place
- Avoid damp basements, wet sheds, or locked vehicles where temperature swings cause condensation
- Store knives in sheaths to protect edges
- Leave multi-tool pivots slightly loose rather than locked tight for extended storage
Inspect moving parts on multi tools (springs, locks, pivots) and lantern latches before each trip. Tighten or lubricate as needed—a few minutes of maintenance prevents frustrating failures at the campsite.
FAQ: Tools for Camping
How many tools do I really need to start camping, and what is the absolute minimum kit?
Beginners can safely start with just three items: a sturdy pocket knife, a small multi-tool with pliers and screwdrivers, and a headlamp. Add a basic repair kit (tape, cord, safety pins) and you’re covered for most situations. Expand your toolkit gradually as you gain experience and discover which specific tasks challenge you most.
Are there any camping tools I should not bring because of park or airline rules?
Large fixed-blade knives (typically over 4-5 inches), machetes, and some saws may be restricted in certain parks—always check regulations before your trip. When flying, all sharp tools must go in checked luggage rather than carry-on bags. This includes multi tools with blades, scissors, and saws. Some international destinations have stricter knife laws, so research requirements when traveling abroad.
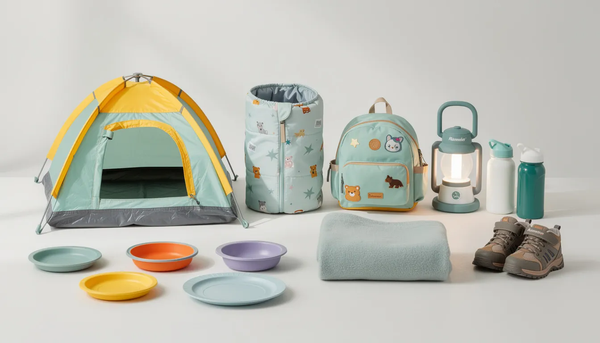
What tools are most important for family camping with kids?
Focus on user-friendly, safe items: a headlamp for each person (kids love having their own light), a bright lantern for evening activities, and a safe locking knife kept under adult supervision. Establish clear rules about who may handle cutting or striking tools, and consider designating a specific “tool station” at camp where sharp items are stored and used only by responsible adults.
How often should I replace or upgrade my camping tools?
Inspect tools before and after every season. Replace items showing cracked handles, loose hinges, excessive rust, or compromised locks immediately—these are safety hazards. Most quality tools last 10-20 years with proper maintenance. Only upgrade when current tools genuinely limit your safety or ability to complete regular tasks; resist the urge to buy new gear just because something shinier exists.
Can I share one toolkit between home, car, and camping use?
Absolutely. Many experienced campers keep a core set of tools—multi-tool, flashlight, and repair pouch—ready in a bag that lives in the car or entryway. This “grab-and-go” approach means essential tools are always available for both everyday fixes and spontaneous camping trips. Just remember to restock consumables (tape, batteries, zip ties) and inspect for wear regularly.
Member discussion