Key Takeaways
- Most backpackers should aim for roughly 1.5–2 lb (680–900 g) of food per day, or about 2,500–4,500 calories depending on distance and terrain.
- The lightest effective backpacking food options are dry, shelf stable, and calorie dense (around 120–130 calories per ounce), including nuts, nut butters, instant mashed potatoes, and dehydrated meals.
- A mixed approach works best: combine commercial freeze dried meals with DIY dehydrated options and simple supermarket staples such as ramen noodles, tortillas, and instant rice.
- Good organization saves weight and stress—pack one labeled food bag per day, repackage items into Ziplocs, and keep snacks in easy access pockets.
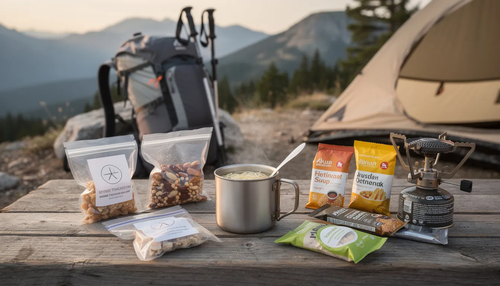
- Throughout this guide, we’ll recommend specific products and brands commonly found on Amazon to help you build your ideal trail food system.
Lightweight Breakfast Ideas for Backpacking
Hot Breakfasts
Instant Oatmeal Variations:
Instant oatmeal remains a backpacking breakfast staple for good reason. Store-bought packets work fine, but you can create more nutritious versions at home by combining rolled oats with powdered milk, dried blueberries, raisins, chia seeds, and a pinch of cinnamon. Portion these into Ziploc freezer bags—just add boiling water and you’re ready in minutes. Boost the caloric density by adding powdered coconut milk or a spoonful of coconut oil.
No-Cook Breakfasts
No-Cook Breakfast Options:
- High-calorie granola with powdered milk (rehydrate with cold water)
- Granola bars like Clif, KIND, or RXBAR
- Peanut butter packets paired with instant coffee
- Trail mix with nuts, seeds, and dried fruit
Lightweight Instant Coffee:
Lightweight instant coffee options like Starbucks Via, Mount Hagen, or Alpine Start are popular among Pacific Crest Trail thru hikers who value caffeine without the weight of brewing equipment. These single serving packets deliver enough energy to get moving without elaborate preparation.
Extra Calorie Boosters:
On cold mornings when you need more calories, add trail mix, almond butter, or single-serve Nutella packets to your breakfast routine. The goal is keeping prep under 10 minutes so you can hit the trail while conditions are optimal.
Lightweight Lunches: No-Cook, On-the-Go Fuel
Base Items for Lunch
Filling Options for Lunch Wraps:
- Peanut butter and honey (classic, reliable, calorie dense)
- Foil packets of tuna or chicken in olive oil (StarKist pouches at 120–150 cal/oz)
- Shelf-stable hummus powders (just add water)
- Hard salami and hard cheeses on cooler-weather trips
- Nut butters of any variety
Avoid heat-sensitive items like soft cheese, mayo-heavy salads, or anything that could spoil in hot weather. These work for short trips in cool conditions but become risky on summer backpacking trips.
Lunch Snacking:
Pair your wrap or sandwich with extra snacks—trail mix, beef jerky, dried fruit—so lunch becomes a grazing session throughout the day rather than a single heavy meal.
Ultralight Backpacking Dinners: Hot Meals with Minimal Weight
Commercial Freeze Dried Meals
Commercial Freeze Dried Meal Options:
Brands like Backpacker’s Pantry, Mountain House, and Good To-Go produce pouches that rehydrate with hot water in 10–15 minutes. Expect to pay $7–$13 per pouch in 2026, with most offering two servings (though hungry hikers often eat the whole thing). These meals typically deliver 120–150 cal/oz after accounting for packaging.
Supermarket Alternatives
Supermarket Dinner Alternatives:
- Instant mashed potatoes with packet gravy
- Ramen noodles boosted with foil-pack chicken
- Couscous with dehydrated vegetables and sun dried tomatoes
- Instant rice mixed with instant soups or tomato paste
These “just add water” options require minimal cooking gear and fuel. Many hikers combine instant rice with a foil pack of tuna or chicken for a filling 500+ calorie dinner.
DIY Dehydrated Meals
DIY Dehydrated Meal Ideas:
- Dehydrated chili
- Pasta sauces
- Curries
- Stews
Using a food dehydrator, you can dry cooked meals at home. These meals rehydrate on trail just like commercial options but cost a fraction of the price and let you control sodium and ingredients.
Smart Snack Strategy: Lightweight Energy All Day
Why Snack Regularly?
Snacking every 60–90 minutes helps prevent energy crashes and keeps your legs moving smoothly on 10–20 mile days. Rather than waiting until you’re exhausted, steady fueling maintains consistent energy throughout the day.
Reliable Lightweight Snack Options
Snack Options for the Trail:
- Trail mix (custom blends of nuts, seeds, and dried fruit)
- Raw or roasted nuts (almonds, cashews, peanuts)
- Seeds (pumpkin, sunflower, hemp)
- Beef jerky or turkey jerky
- Energy chews (Clif Bloks, GU)
- High-calorie bars (Clif, ProBar, RXBar)
- Banana chips and fruit leather
- Dried fruit (sparingly—lower calorie density)
Avoid chocolate-coated bars during hot desert or mid-summer trips unless stored deep in your pack away from sun exposure. Melted chocolate creates a mess and can ruin other food items.
Preventing Snack Fatigue
Prevent Snack Fatigue:
Vary flavors and textures. Pack a mix of sweet, salty, crunchy, and chewy options. After a week of eating the same granola bars, even healthy foods start to taste great only in memory. Variety maintains appetite and morale on long journeys.
Ultralight Food Principles & Hacks
Ultralight backpacking food isn’t about going hungry—it’s about removing unnecessary water weight and bulk while maintaining taste and nutrition. These strategies help you save weight without sacrificing the energy you need.
Key Ultralight Food Principles
- Choose dry food with low moisture content (dehydrated meals, dry grains, jerky, nuts).
- Aim for at least 100–130 calories per ounce as a baseline for ultralight hikers.
- Limit foods below 100 cal/oz or reserve for short trips where weight matters less.
- Test ultralight foods on shorter trips before committing to them on a week-long section hike.
These ultralight strategies prove especially valuable on long trails like the John Muir Trail, Pacific Crest Trail sections, or high-mileage weekend pushes where every ounce counts over dozens of miles.
Repackage & Portion for Less Bulk
Repackaging Tips:
- Repackage foods into quart or gallon Ziploc freezer bags before your trip.
- Reduces the trash volume you’ll carry out.
- Eliminates noisy crinkly packaging.
- Allows custom portion sizes for each day.
- Compresses more efficiently in bear canisters.
Labeling:
Label each bag with the meal name, day, and calorie estimate using a permanent marker. For example: “Day 2 Dinner – Chili – 650 cal”.
Add Spices, Oils & Condiments
Spice Kit Essentials:
- Salt and pepper
- Garlic powder
- Chili flakes or cayenne
- Curry powder
- Italian herb blend
Condiment Packets:
Single-serve condiment packets from restaurants work perfectly on trail. Collect hot sauce, soy sauce, mustard, and mayo packets over time, or purchase meals of bulk single serving packets online.
Oils:
Small leak-proof bottles of olive oil significantly boost calories and flavor with minimal added weight. One tablespoon adds roughly 120 calories to any meal.
Packing Tip:
Pack all spices and oils in a dedicated small zip bag to contain any potential leaks within your food bag.
Include Limited Fresh Foods
Durable Produce That Travels Well:
- Apples (hardy, don’t bruise easily)
- Small oranges or clementines
- Baby carrots
- Snap peas
- Cherry tomatoes (for day one only)
These work best on cooler shoulder-season trips where heat won’t accelerate spoilage. Fresh fruits and vegetables provide vitamins and fiber that dry food often lacks.
Leave No Trace:
All cores, peels, pits, and scraps must be packed out. Leave No Trace principles apply to “biodegradable” food waste too—orange peels don’t belong on the trail.
Try DIY Dehydrated Meals
Popular DIY Recipes for Backpacking:
- Dehydrated spaghetti Bolognese
- Thai curry with instant rice
- Black beans and rice
- Lentil stew with vegetables
- Chili with dehydrated vegetables
Dehydrating gives you complete control over sodium levels, spice intensity, and ingredient quality, while camp stoves like the Camp Chef Stove 2 Burner make trail cooking fast and versatile. You can accommodate dietary restrictions that commercial options don’t address and create meals that taste great to your specific preferences.
Dehydrator Investment:
The upfront investment in a food dehydrator (typically $50–$150 for quality models) pays off quickly for frequent backpackers.
Warm Drinks for Comfort & Hydration
Hot Drink Options:
- Tea bags (black, green, or herbal)
- Instant cocoa packets
- Instant apple cider mix
- Powdered broth or bouillon cubes
Hot drinks help with staying warm during cold nights, boost morale during bad weather, and gently increase fluid intake, and pairing them with efficient electric camping kettles at powered campsites can make hot water prep nearly effortless.
Electrolyte Drink Powders:
Brands like Nuun, LMNT, or Liquid IV help replace minerals lost through sweat during demanding days.
Avoid Heavy Canned & Glass-Packaged Foods
Why Avoid Canned & Glass-Packaged Foods:
- Heavy water content you’ll drain off anyway
- Bulky metal packaging that doesn’t compress
- Empty cans add weight on the hike out
- Glass jars are breakable, heavy, and impractical for trail conditions
- Organizing Lightweight Food for Multi-Day Trips
The Daily Bag System
Pack food “by the day” rather than by food type. This system eliminates decision fatigue and ensures you don’t accidentally eat tomorrow’s dinner tonight.
Steps for the Daily Bag System:
- Use one large Ziploc or lightweight dry bag per day.
- Inside, place smaller bags labeled breakfast, lunch/snacks, and dinner.
- Stack daily bags with Day 1 on top, last day at bottom.
- Color-code or number bags for quick identification.
This organization works whether you’re using a bear canister, Ursack, or standard stuff sack. Everything stays together, and you can grab tomorrow’s food without sorting through your entire supply, which is especially helpful when cooking on durable iron camping cooker stoves that support more involved meals.
Benefits:
Proper organization also prevents the common problem of overeating early in the trip. When Day 3’s food is clearly separated from Day 1’s food, you’re less likely to dip into future rations when today’s snacks run out.
Kitchen Kit, Fuel & Water Considerations
Essential Cooking Gear
Minimalist Cooking Gear Checklist: A well-chosen camping mess kit keeps this gear compact, durable, and easy to clean on the trail.
- Small stove (canister or alcohol)
- One lightweight pot (700–900ml works for most solo hikers)
- Long-handled spoon or spork
- Lighter and backup matches
- Insulated mug (optional but worthwhile)
Meals that only require heating water—freeze dried dinners, instant oats, instant rice, ramen—use less fuel and simplify cleanup compared to actual cooking, especially when paired with lightweight camping kettles suited to backpacking and car camping.
Fuel Planning
Rough Fuel Planning:
- A 100g isobutane canister typically supports 8–10 boils for two people on a 3–5 day trip in mild conditions.
- Cold weather, wind, and altitude all increase fuel consumption.
Water Availability
Camping near reliable water sources allows more flexibility, especially when you’re using durable backpacking canteens matched to your water needs. Dry camps require carrying extra water for cooking, adding significant weight. Plan your daily mileage with water availability in mind, especially in desert or ridge-top terrain, and don’t overlook how lightweight camping shoes with good traction and drainage affect how far you can comfortably hike between sources.
Leave No Trace & Wildlife-Safe Food Storage
Packing Out Trash
Pack Out All Trash, Including:
- Micro-trash (twist ties, corner cuts from packets)
- Instant coffee packets and tea bags
- Bar wrappers and foil
- “Biodegradable” items like fruit peels and nut shells
Orange peels take 2+ years to decompose in alpine environments. Leaving them behind isn’t composting—it’s littering.
Cost-Saving Tips for Lightweight Backpacking Food
DIY Dehydrating
DIY dehydrating requires upfront investment but pays dividends for frequent backpackers. A $75 dehydrator making 50+ meals over its lifetime drops per-meal costs dramatically.
FAQ: Lightweight Food for Backpacking
How many days of lightweight food can I realistically fit into a bear canister?
For an average hiker packing 2,500–3,000 calories per day at 120–130 calories per ounce, most standard bear canisters hold about 4–7 days of food. The BearVault BV500 (largest common model) fits toward the higher end, while the BV450 sits around 4–5 days.
Careful repackaging makes a significant difference. Avoiding bulky items like bread loaves, chip bags, and excessive packaging pushes you toward the 7-day range. Favoring dense foods like nuts, nut butter, and instant potatoes maximizes your canister capacity.
Do a test pack at home before your trip to see how many days of your typical food actually fits your specific canister model. This prevents frustrating surprises at the trailhead.
Can I eat only no-cook food to skip carrying a stove?
Fully no-cook backpacking is absolutely possible and commonly practiced by ultralight hikers, especially in summer or on fastpacking trips. This approach eliminates stove weight, fuel weight, and cooking time.
No-Cook Food Options:
- Tortillas with peanut butter or nut butters
- Beef jerky and hard cheese (first 1–2 days)
- Nuts and seeds
- Energy bars and granola bars
- Cold-soaked ramen or couscous
- Instant mashed potatoes rehydrated in cold water
- Fruit leather and dried fruit
- Sweet corn chips with dip mixes
The trade-off is giving up hot meals and warm drinks, which matters more in cold, wet, or high-elevation conditions where hot food boosts comfort and core temperature. Many hikers find hot meals critical for morale after difficult days.
What are good lightweight options for vegetarian or vegan backpackers?
Plant-based backpackers have excellent options for maintaining enough calories and protein on trail.
Recommended Staples:
- Instant oatmeal with powdered coconut milk
- Couscous and instant rice (fast-cooking grains)
- Dehydrated lentils and black beans
- Nut butters (almond, peanut, cashew)
- Trail mix with seeds and nuts
- Vegan jerky (soy-based options at 100–120 cal/oz)
- Dried tofu (shelf stable protein source)
- Texturized vegetable protein (TVP)
Many freeze dried brands now offer dedicated vegan and vegetarian backpacking meals—lentil stews, vegetable curries, and bean-based dishes that purchase meals simplify meal planning.
Check ingredients carefully for hidden dairy, honey, or animal products. Test meals at home to ensure they’re filling enough for your hiking demands.
How do I keep my backpacking food safe in hot weather?
High temperatures dramatically shorten the safe window for perishable items. Soft cheese, fresh meat, anything with mayonnaise, and dairy-based foods become risky after several hours in summer heat.
Hot Weather Food Strategies:
- Limit perishables to day one only
- Rely fully on shelf stable dry foods after the first morning
- Store heat-sensitive items deep in your pack, insulated from direct sun
- Never leave food in a hot car for hours before hitting the trail
- Avoid chocolate-coated bars that melt into messy disasters
Foil-pack proteins, dried meals, nuts, and jerky all handle heat without spoilage concerns. These should form the backbone of summer backpacking trips.
Planning your lightweight food system takes some upfront effort, but the payoff is worth it: more comfortable miles, enough calories to power through demanding days, and the satisfaction of a well-organized pack.

Member discussion