Heading into avalanche terrain without the right gear is like driving without a seatbelt—except the consequences arrive faster and leave less room for second chances. Whether you’re skinning up a backcountry bowl, dropping into sidecountry from the chairlift, or snowmobiling across steep alpine slopes, avalanche safety tools are the non-negotiable foundation of responsible winter travel.
This guide is for backcountry skiers, snowboarders, snowmobilers, and anyone venturing into avalanche terrain. Having the right avalanche safety tools can mean the difference between life and death in the backcountry.
Key Takeaways
- Every person in avalanche terrain must carry their own transceiver, shovel, and probe—no exceptions, no sharing, every single outing.
- Training and regular practice matter more than buying the fanciest gear; survival chances drop sharply after roughly 10–15 minutes of burial.
- Avalanche airbag packs, RECCO reflectors, and snow science tools are valuable add-ons but never replace the “Big Three” rescue essentials.
- This guide focuses on real, buyable gear—mostly available on Amazon—with practical purchase tips for backcountry skiers, riders, and snowshoers.
- You’ll find an FAQ at the end answering common questions like “Do I need an airbag pack?” and “Can RECCO replace a beacon?”
Essential Avalanche Safety Tools Checklist:
- Transceiver (Beacon): The only reliable means of quickly locating a buried person in areas without RECCO detectors.
- Shovel: Essential for digging out avalanche debris to reach a buried person.
- Avalanche Airbag Pack: Can help keep you from getting buried in an avalanche by increasing your volume and helping you stay on top of moving snow.
- RECCO Reflector: A passive device in clothing or gear that can help rescuers find you if you are caught in an avalanche, especially near ski resorts.
- Helmet: Protects against head trauma, a leading cause of death in avalanches.
- Communication Devices: Such as satellite messengers, which allow users to send signals for help even in areas without cell service.
- Two-Way Radio: Essential for maintaining communication between group members in high-risk areas.
- Slope Meter (Inclinometer): Used to determine the angle of a slope for avalanche probability.
- Snow Saw: Used for snow stability tests in conjunction with a snow shovel.
- Crystal Card: Helps evaluate the layers of the snowpack when doing a snow-pit profile.
- Emergency Tarp: Can be used for shelter or evacuating injured individuals.
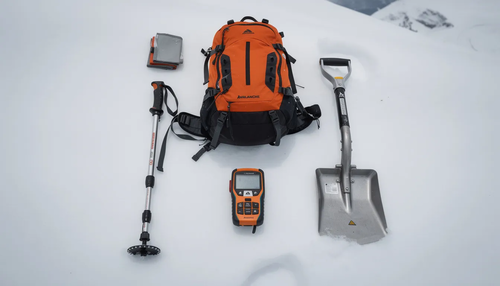
The Non-Negotiable Big Three: Transceiver, Probe, Shovel
These three tools are mandatory anytime you travel in avalanche-prone terrain, regardless of your experience level or how “mellow” the day is supposed to be. A quick sidecountry run can turn deadly in minutes if conditions align wrong.
Every partner must have functional gear, know how to use it, and practice together pre-season and multiple times each winter. Owning the equipment isn’t enough—you need the muscle memory to deploy it under stress, when adrenaline is pumping and time is measured in heartbeats.
The statistics are stark: ICAR reports that 92% of beacon-equipped burials are located, versus only 46% without. That gap is the difference between life and death.
Avalanche Transceivers (Beacons)
Avalanche transceivers are the only reliable means of quickly locating a buried person in areas without RECCO detectors. Modern beacons are 457 kHz digital transceivers that allow you to locate buried victims by switching between transmit and search modes. Older analog-only units should be retired—they lack the precision and features needed for efficient multi-burial scenarios.
Key buying features to look for:
- Use fresh alkaline batteries (avoid lithium unless the manufacturer explicitly allows it)
- Replace batteries when they drop to 40–50% charge
- Check battery level before every trip
- Battery lifespan typically runs 200–400 hours at cold temperatures
Practice realistic search scenarios at the start of each season: signal search, coarse search, fine search, and pinpointing. Your beacon is only as effective as your ability to use it quickly under pressure.
Avalanche Probes
Probes confirm the exact burial depth and location after your beacon leads you to the general area. This step dramatically speeds up digging because you know precisely where to dig and how deep.
Length recommendations:
- Minimum 240 cm for tree-line touring
- 280–320 cm preferred for deep-snow regions like the Rockies, Wasatch, or Coast Mountains
Material and construction factors:
- Lightweight aluminum or carbon poles (carbon saves weight but costs more)
- Quick snap together assembly with cable or cord locking mechanism
- Clear depth markings in centimeters
- Grippy top handle for cold, gloved hands
Avoid very flimsy budget probes. They can kink or fail in heavy, debris-filled avalanche snow—exactly when you need them most. The job of a probe is to handle repeated deep insertions without bending, and cheap products often can’t meet that standard.
Packing and deployment:
- Store your probe where you can access it in seconds (external pocket or top of pack)
- Practice quick snap together assembly until it becomes automatic
- Rehearse probe line searches with partners a few times per season
Avalanche Shovels
A shovel is essential for digging out avalanche debris to reach a buried person. The shovel often takes the most time and effort in a real rescue. Avalanche debris can set up as hard as concrete within minutes, and you may need to move up to a ton of snow to reach a buried victim. Blade size, strength, and ergonomics are critical.
Blade requirements:
- Metal only (preferably aluminum)—plastic shatters in cold
- Minimum blade size of 20 cm x 20 cm for efficiency
- Curved edges help cut through hardened snow
Handle features:
- Sturdy telescoping handle with lightweight fiberglass handle sections or aluminum construction
- Comfortable T or D grip usable with thick gloves
- Adequate length for leverage—short handles increase fatigue
Slightly heavier but stronger shovels are often better than ultralight “race” designs. When removing snow from a burial site, you need durability and power, not grams saved—and a separate survival shovel for general outdoor emergencies can complement your dedicated avalanche shovel without compromising rescue performance. .
Look for hoe-mode capability where the blade can be rotated 90 degrees. This feature speeds excavation in team-digging strategies, allowing one person to rake snow while another digs.
Basic rescue digging strategy: Start downhill of the probe hit and work toward the burial at an angle. Use conveyor-style digging with partners to move snow efficiently.
Training: The Most Important “Tool” You Carry
Gear alone cannot save lives. Without training, decision-making skills, and ongoing practice, your expensive equipment becomes dead weight in your pack. The most important safety tools are the skills in your head and the habits you’ve built through repetition.
Survival statistics make this clear: burials beyond about 10–15 minutes see a steep drop in survival odds. This means your group has a narrow window to locate, probe, and dig out a buried partner. Professional rescue teams—even with helicopters—often can’t arrive in time.
Take a formal avalanche course. Sign up in early winter (November–January) for a Level 1 or “Companion Rescue” class. These courses teach you to read terrain, interpret snow conditions, and execute fast rescue protocols.
US-based resources for finding courses:
- Avalanche.org for regional forecasts and education links
- AIARE (American Institute for Avalanche Research and Education)
- Regional avalanche centers (Colorado Avalanche Information Center, Northwest Avalanche Center, etc.)
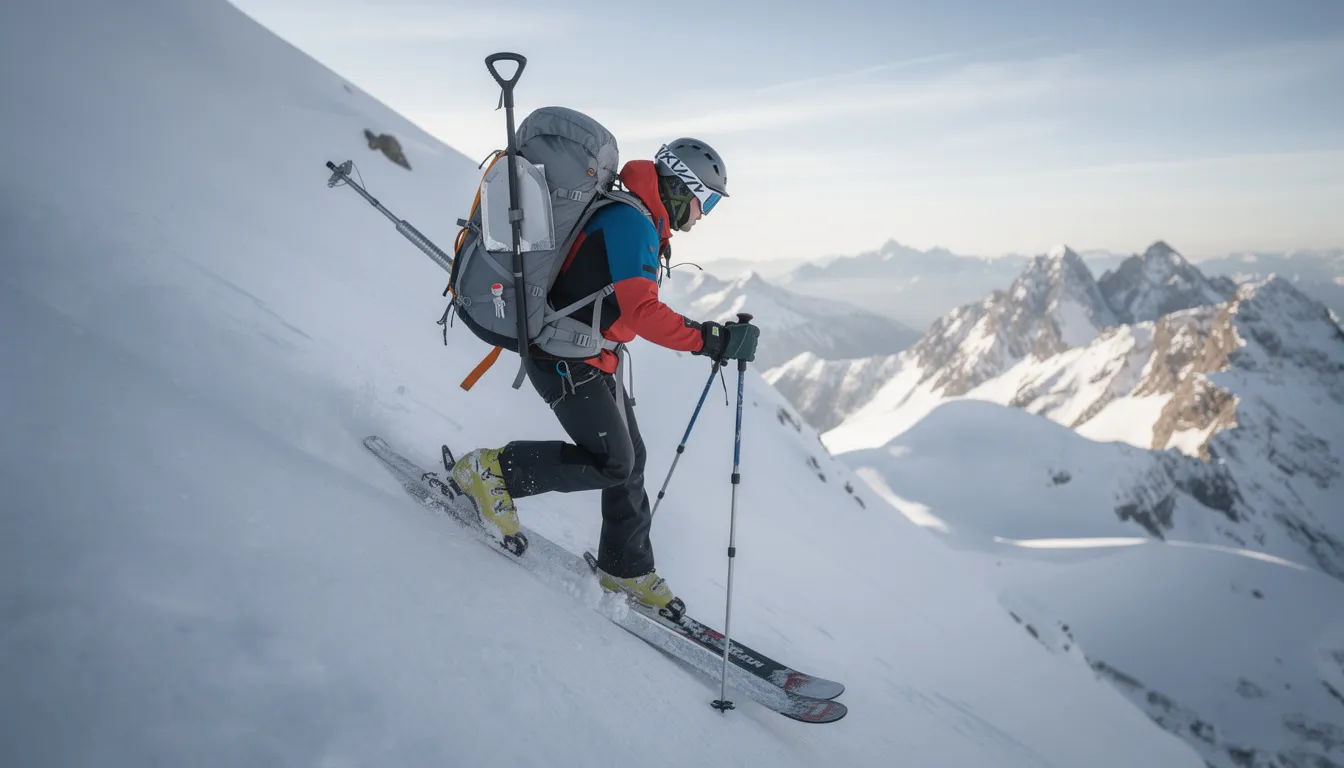
Airbag Backpacks
An avalanche airbag pack can help keep you from getting buried in an avalanche by inflating large balloons (150–200 liters) when you pull a ripcord. This increases your volume, exploiting a physics principle called inverse segregation—larger objects tend to rise in granular flow. Field studies suggest airbags can reduce burial risk by up to 50%.
Important limitations:
- Not effective against trauma (cliffs, trees, rocks)
- Useless in terrain traps where debris piles deep regardless of position
- Requires practice for instinctive deployment within seconds
- Adds 5–7 kg to your pack weight
System comparison:
System Type | Pros | Cons |
|---|---|---|
Canister-based | Proven reliability, lighter weight | Limited deployments per fill, $100+ refills, air travel restrictions |
Electric fan | Unlimited practice inflations, rechargeable | Heavier, battery concerns in extreme cold |
Buying factors: total pack volume (liters), fit, air travel compatibility for canisters, maintenance requirements, and trigger placement for easy deployment. Practice pulling the handle with training cartridges or fan packs until it becomes automatic so you can focus on other essentials like shelter, heat, and even comfort-focused camping gear such as fans. | ||
. |
RECCO Reflectors
A RECCO reflector is a passive device in clothing or gear that can help rescuers find you if you are caught in an avalanche, especially near ski resorts. RECCO reflectors are small passive tags integrated into some jackets, pants, boots, and helmets. They bounce signals from detector equipment used by ski patrol and search-and-rescue teams. The technology is non magnetic and non sparking, requiring no batteries or maintenance.
Key clarifications:
- RECCO is primarily useful near ski resorts and popular backcountry zones where responders have detectors
- Partners cannot search for RECCO tags with consumer gear
- RECCO does not replace an avalanche transceiver for companion rescue
Think of RECCO as a backup tool for organized search teams—useful if you’re caught near a resort boundary, but essentially worthless in remote wilderness. Standalone RECCO stickers and straps can be added to existing gear inexpensively, making them a low-cost addition to your safety collection.
Snow Safety & Snow Science Tools
For riders who want to go beyond simple “yes/no” decisions and actually understand snowpack structure, weak layers, and slope angles, snow science tools are essential, as are broader tips for surviving in the wild that cover shelter, navigation, and other backcountry fundamentals. .
Common tools:
Tool | Purpose |
|---|---|
Slope meter/inclinometer | A slope meter is used to determine the angle of a slope for avalanche probability. |
Snow saw (30–60 cm blade) | A snow saw is used for snow stability tests in conjunction with a snow shovel; also useful for cutting blocks for wind walls or shelters. |
Crystal card + magnifier | A snow crystal card helps evaluate the layers of the snowpack when doing a snow-pit profile, while a dedicated backpack trowel for outdoor adventures is useful for non-avalanche digging tasks that follow Leave No Trace principles. |
. |
A simple inclinometer can prevent accidentally committing to dangerous slopes. It takes seconds to use and offers a ground truth check against assumptions.
These tools are “knowledge amplifiers”—only as useful as your training and willingness to interpret results conservatively. Taking a Level 1 or Level 2 course that covers snow science makes these investments worthwhile, as does planning for basic comfort items like a portable toilet for camping trips when you’re staged near backcountry trailheads or huts.
Planning, Communication, and Non-Technical Safety Essentials
Some of the most important avalanche “tools” aren’t products at all—they’re habits. Trip planning, group communication, and basic emergency gear can be the difference between a close call and a tragedy.
Daily avalanche bulletins from regional avalanche centers should inform your go/no-go decisions before leaving the trailhead. Checking the forecast takes five minutes and can cancel a trip that conditions have made too risky. Many centers publish video updates and detailed analysis you can read during your morning coffee.
Route planning essentials:
- Review maps and apps to identify safe ascent lines
- Select descent options with bailout routes
- Mark areas of concern (terrain traps, overhead hazard, exposure)
- Discuss the plan with your group so everyone knows the order of operations
Buying Avalanche Safety Tools Online (and Avoiding Common Mistakes)
Most readers will purchase avalanche gear online through retailers like Amazon. This is fine—the market offers solid options—but you need to shop smart.
Avoid these mistakes:
- Buying obviously outdated transceivers (older than 10–12 seasons or missing features like triple antennas and modern marking functions)
- Purchasing used beacons without knowing their history (no way to verify they weren’t damaged)
- Choosing the cheapest probe or shovel without checking material quality
- Ignoring compatibility (ensure your pack fits your shovel and probe)
Smart buying practices:
- Look for reputable manufacturer names and current model year products
- Verify clear product descriptions and downloadable manuals
- Check independent reviews, verified buyer feedback, and professional tests
- Compare prices across sellers—but don’t sacrifice quality for cost savings
- Ensure the item ships from a legitimate seller with return policies
Skip the cedar shake roof rakes labeled as avalanche shovels—they’re designed for clearing snow from your house, not rescuing buried partners. Look for gear specifically manufactured for avalanche rescue.
What to expect on prices:
- Digital beacons: $300–500 for quality models
- Probes: $40–100 depending on material and length
- Shovels: $50–80 for durable aluminum with telescoping handles
- Airbag packs: $600–1,200+ depending on system type and pack volume
The Big Three together runs roughly $400–700 complete. This is an investment that can last many seasons with proper care, spreading the cost across years of safer adventures.
FAQ: Avalanche Safety Tools
Below are answers to common follow-up questions that weren’t fully covered above. These address real scenarios backcountry travelers encounter.
Do I really need all three: transceiver, probe, and shovel?
Yes. Anyone stepping into avalanche terrain should carry all three tools on every outing, regardless of experience or how mellow the day is supposed to be.
A transceiver without a probe and shovel only lets you find a rough location—you’ll be digging blindly without knowing the depth or exact spot. A shovel without a beacon leaves you searching randomly across a debris field while time runs out. Each tool is part of a complete system that only works together.
Don’t share a “group shovel” or “group probe.” Treat these as personal items like helmets—each person carries their own, every time.
Can RECCO reflectors replace an avalanche beacon?
No. RECCO reflectors cannot replace a beacon for backcountry travel because your partners cannot search for RECCO tags with standard consumer gear.
RECCO is designed for professional rescuers—ski patrol, helicopter SAR teams—who have specialized detectors and often only arrive well after the crucial first 10–20 minutes when survival odds plummet. In remote terrain, they may never arrive at all.
Treat RECCO as a useful backup, especially near ski areas, but always carry a modern transceiver, probe, and shovel for partner rescue.
Do I need an avalanche airbag pack as a beginner?
Beginners should focus first on the essentials: a solid beacon, probe, and shovel; a Level 1-style avalanche course; and conservative terrain choices with experienced partners. These fundamentals matter far more than any add-on gear.
Airbag packs provide an extra margin of safety but cost $600–1,200+, add significant weight, and make the most sense once you’re committed to regular backcountry travel. Consider renting or borrowing an airbag pack for a trip or two to see how it fits and carries before investing.
How often should I practice with my avalanche gear?
At minimum, run one focused practice session before each winter season and quick refreshers every few outings, especially early in the year when skills are rustiest.
Practice complete scenarios: switching beacons to search mode, locating buried practice beacons, assembling probes quickly, and moving real snow with shovels in timed drills. Include group communication—who leads the search, who digs, who manages scene safety—to build habits that transfer under stress.
Studies show avalanche rescue proficiency decays significantly within a year without refreshers. An hour of practice in November is worth more than expensive gear you haven’t touched since last spring.
Is avalanche gear worth it if I only tour a few times per year?
Absolutely. Avalanche accidents are about conditions and terrain, not how many days someone tours. A single outing in unstable conditions can be deadly—the mountain doesn’t care whether it’s your first day out or your fiftieth.
Quality beacons, probes, and shovels can last many seasons when cared for, spreading the cost over years of safer adventures. If you’re only going out a few times per winter, consider joining guided trips or partnering with people who have strong local knowledge. Treat your limited days as extra reason to be conservative with terrain choices—and never as justification to leave safety tools behind.
Member discussion